If you’ve ever needed extra space behind your Honda CRV glove box or had to fix something inside it, you know that removing it can feel tricky. But don’t worry—removing your Honda CRV glove box is easier than you might think.
In this guide, you’ll get simple, step-by-step instructions that anyone can follow. By the end, you’ll save time, avoid frustration, and have full access to your glove box area like a pro. Ready to get started? Let’s dive in.
Tools Needed
Removing the glove box from a Honda CRV is a simple task if you have the right tools. Having the correct tools makes the job faster and safer. It also prevents damage to the glove box or car interior.
Gather the tools before starting. This saves time and avoids frustration. Most tools are common and easy to find.
Phillips Head Screwdriver
A Phillips head screwdriver is needed to remove screws holding the glove box. Choose a medium size for a good fit. This tool helps avoid stripping screws.
Flat Head Screwdriver
A flat head screwdriver helps pry open clips or panels gently. Use it carefully to avoid scratching surfaces. It also assists in disconnecting any locking tabs.
Trim Removal Tool
A plastic trim removal tool is ideal for popping out trim pieces without damage. It is safer than using metal tools. This tool protects the car’s plastic parts.
Socket Wrench Set
A socket wrench set may be necessary for bolts inside the glove box area. Use the correct socket size to prevent rounding bolts. This tool provides better leverage for tight fasteners.
Flashlight
A flashlight helps see screws and clips in dark or tight spaces. Good lighting reduces mistakes and speeds up the process. A small, bright flashlight works best.
Credit: www.hcrv.net
Locate The Glove Box
Finding the glove box is the first step to removing it from your Honda CRV. The glove box is a small storage compartment in the front passenger side of the car. It holds important items like the car manual, registration, and small tools.
Knowing its exact location helps in quick and safe removal. It also prevents damage to other parts of the dashboard. This section guides you to identify the glove box with ease.
Identify The Passenger Side Dashboard
The glove box is built into the dashboard on the passenger side. Sit in the front passenger seat to get a clear view. Look directly in front of you, below the airbag area. The glove box is the only compartment with a small handle or latch.
Spot The Glove Box Handle
The handle or latch is usually centered on the glove box door. It may be a simple pull handle or a button. Press or pull it lightly to confirm the glove box door opens. This confirms you have found the right part.
Check For Surrounding Components
Notice the glove box is surrounded by the dashboard trim. The edges are smooth and flush with the dashboard. The glove box door hinges at the bottom. This design allows it to open downward like a small door.
Empty The Glove Box
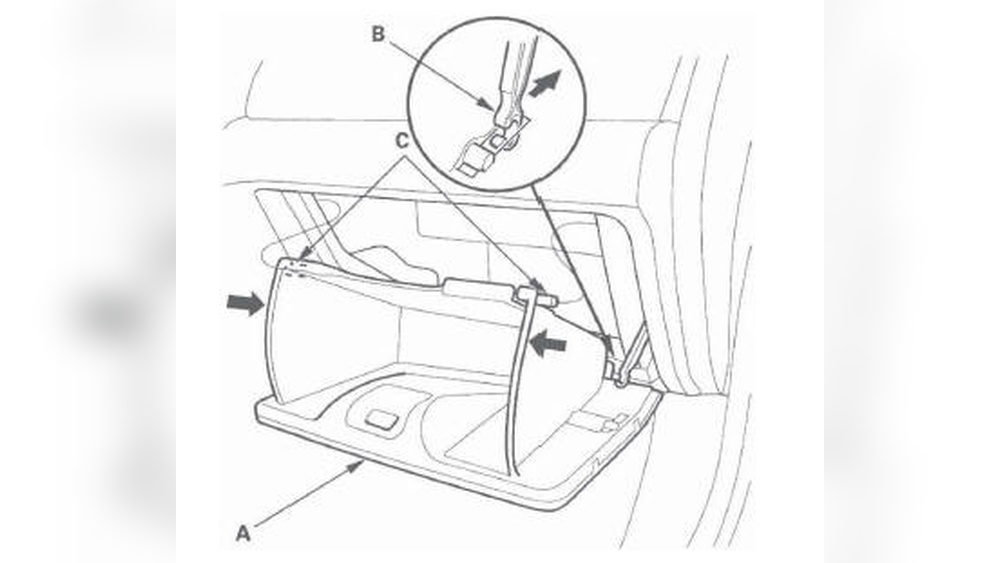
Start by opening the glove box fully. Press the sides inward to release the stops. Then, gently pull the glove box out to remove it from your Honda CRV.
Start by taking everything out of the glove box. Remove all papers, manuals, and small items inside. This makes the removal process easier and safer. An empty glove box gives you clear access to the screws and clips.
Clearing the glove box also prevents any items from falling out or getting lost. It keeps your car clean while you work. Take a moment to organize the contents you remove. Put important papers in a safe place to avoid misplacing them.
Emptying the glove box is a simple step. It saves time and frustration later. Always check twice that nothing remains inside before moving on.

Credit: www.reddit.com
Disconnect The Damper Arm
The damper arm controls how the glove box opens and closes. Disconnecting it is an important step before removing the glove box. This part slows down the glove box door, preventing it from dropping open too fast.
Removing the damper arm carefully avoids damage to the glove box and surrounding parts. It also makes the glove box easier to take out.
Locate The Damper Arm
Open the glove box fully to see inside the compartment. The damper arm is usually on the right side. It looks like a small rod connected to the glove box frame.
Remove The Plastic Clip
Find the plastic clip holding the damper arm in place. Use a flat tool to gently pry the clip off. Be careful not to break it, as you will need it later.
Detach The Damper Arm
After removing the clip, pull the damper arm away from the glove box. It should come off easily with light pressure. Keep the arm safe for reinstallation.
Release The Glove Box Stops
Releasing the glove box stops is a key step in removing the glove box from a Honda CRV. These stops prevent the glove box door from falling out completely. Removing or pushing them allows the glove box to swing down freely. This makes it easier to access the area behind the glove box.
Handle the stops gently. They are usually small plastic pieces on the sides of the glove box. Press or squeeze them to release the glove box door. This step requires some patience and care to avoid breaking the stops.
Locate The Glove Box Stops
Open the glove box fully. Look at the sides of the glove box door. Find the small stops that block the door from opening more. These stops are often near the hinges. Identifying them clearly is important before trying to release them.
Press Or Squeeze The Stops
Use your fingers to press or squeeze the stops. They may need to be pushed inward or downward. This action frees the glove box door from its limits. Apply steady pressure but avoid forcing the stops. Gentle handling prevents damage.
Lower The Glove Box Door
After releasing the stops, slowly lower the glove box door. It should swing down easily. This creates enough space to remove the glove box completely. Keep the door supported as you work to avoid stress on the stops.

Credit: www.youtube.com
Remove The Glove Box
Removing the glove box in a Honda CRV helps access parts behind it easily. This step is useful for repairs or upgrades inside the dashboard. The process is simple and requires only basic tools.
Follow each step carefully to avoid damage. Take your time and work gently.
Open The Glove Box Fully
Start by opening the glove box all the way down. This gives you clear access to the screws and clips inside. Remove any items inside the glove box before you start.
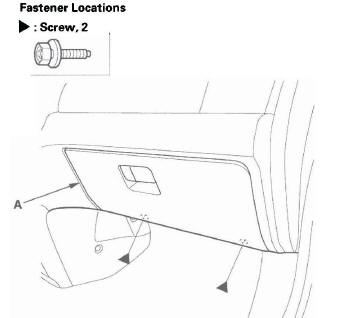
Locate And Remove The Screws
Look inside the glove box for screws holding it in place. Use a screwdriver to remove these screws carefully. Keep the screws safe for reassembly later.
Disconnect The Glove Box Stopper
Find the stopper arm on the side of the glove box. Gently pull it out or unclip it to free the glove box from the dashboard. This step may need a little force but be careful not to break the stopper.
Lower And Remove The Glove Box
Once the screws and stopper are removed, lower the glove box gently. Pull it out toward you slowly. The glove box should come out easily without resistance.
Inspect And Clean The Area
Before removing the glove box of a Honda CRV, it is important to inspect and clean the area. This step helps avoid damage and keeps your car interior tidy. Dirt and debris can block hinges or catches. Cleaning ensures smooth removal and reinstallation of the glove box.
Take your time to check every corner. A clean workspace makes the task easier and safer. Follow these simple steps to inspect and clean the glove box area properly.
Check For Loose Items And Debris
Open the glove box fully. Remove all items inside carefully. Look for small objects that might fall or get stuck. Clear out any trash, dust, or crumbs. Use a soft cloth or brush to remove dirt from corners and edges.
Inspect Hinges And Latches
Look closely at the glove box hinges and latches. Make sure they are not cracked or broken. Clean around these parts to avoid dust buildup. Dust can cause the glove box to stick or not close properly.
Wipe Down Surfaces
Use a damp cloth or mild cleaner to wipe the glove box surfaces. Clean the inside and outside for a fresh look. Avoid using harsh chemicals that may damage plastic parts. Dry everything thoroughly before proceeding.
Check Surrounding Dashboard Area
Inspect the dashboard area around the glove box. Remove any dust or debris that might interfere with removal. Clean vents, panels, and any nearby buttons gently. A clean dashboard supports easier glove box handling.
Reinstalling Tips
Reinstalling the Honda CRV glove box needs care and attention. A smooth reinstallation keeps it working well and safe.
Follow easy steps to avoid damage and ensure it fits right back.
Align The Glove Box Carefully
Check the glove box edges before placing it back. Make sure all parts line up with their slots. This prevents scratches and helps it close properly.
Secure All Screws Firmly
Use the correct screws for each spot. Tighten them just right—not too loose, not too tight. Proper screw placement keeps the glove box steady and safe.
Test The Door Movement
Open and close the glove box door several times. It should move smoothly without sticking. Adjust if it feels tight or loose.
Reconnect Any Electrical Components
Some glove boxes have lights or locks. Reconnect these parts carefully before closing the box. Double-check all connections work well.
Frequently Asked Questions
How Do I Remove The Glove Box On A Honda Crv?
To remove the glove box, first open it fully. Press the sides inward to release the stops. Lower it gently and disconnect any attached cables carefully.
What Tools Are Needed To Remove Honda Crv Glove Box?
You generally need a screwdriver, usually Phillips head, to remove screws. Some models may require a flathead or trim removal tool. Check your specific model for exact tools.
Can I Remove The Glove Box Without Disconnecting The Battery?
Yes, you can remove the glove box without disconnecting the battery. However, if your glove box contains electrical components, it’s safer to disconnect the battery first.
How Long Does It Take To Remove A Honda Crv Glove Box?
Removing the glove box typically takes 5 to 10 minutes. It depends on your experience and the model year of your Honda CRV.
Conclusion
Removing the Honda CRV glove box is a simple task. Follow the steps carefully to avoid damage. Take your time and use the right tools. This helps you access parts behind the glove box easily. Remember to keep screws and clips safe.
Practice makes the process quicker and smoother. Now, you can handle small repairs or upgrades yourself. Save money and feel confident working on your car. Keep this guide handy for future use. Easy and useful!