Have you ever wanted to create something fun and exciting with your own hands? Imagine building a spring loaded boxing glove that actually punches back when you push it.
It’s a cool project that combines simple materials with a clever design. In this guide, you’ll learn step-by-step how to make your very own spring loaded boxing glove. Whether you’re looking for a fun challenge or a unique toy to impress your friends, this project is perfect for you.
Keep reading, and by the end, you’ll have a glove that’s ready to pack a punch!

Credit: gorctrails.com
Materials Needed
Gathering the right materials is the first step in making a spring loaded boxing glove. Choosing quality parts helps the glove work well and last longer. Prepare all items before starting the project. This saves time and keeps the process smooth.
Boxing Glove Selection
Pick a glove that fits your hand comfortably. Leather or synthetic gloves work best. Avoid gloves that are too soft or too hard. A medium firmness glove offers good support and space for the spring.
Make sure the glove has enough room inside. This space allows for the spring and other parts. Check the glove’s stitching. Strong stitching keeps the glove intact during use.
Spring Options
Choose a spring that matches the glove size. A coil spring with medium tension works well. The spring should be strong but flexible. Too stiff springs can be hard to compress.
Measure the spring length carefully. It must fit inside the glove without stretching. Steel springs are durable and hold shape better. Avoid rusty or weak springs for safety reasons.
Additional Tools And Supplies
Gather tools like pliers, scissors, and a screwdriver. These help in fixing parts and cutting materials. Use strong glue or tape to secure the spring inside. Extra padding can protect your hand and improve comfort.
Have safety gloves ready to prevent injuries. A ruler or measuring tape helps with precise fitting. Keep all supplies organized to avoid losing small pieces during assembly.
Preparing The Glove
Preparing the glove is the first step in making a spring loaded boxing glove. It helps create space for the spring inside the glove. This step ensures the glove works smoothly and safely.
Take your time to handle the glove carefully. Avoid damaging the outer fabric or stitching. A well-prepared glove lasts longer and feels better to use.
Removing Padding
Start by removing some padding from inside the glove. Use a sharp tool like a seam ripper or scissors. Cut carefully to avoid tearing the glove’s outer layer.
Remove enough padding to fit the spring comfortably. Keep the removed padding pieces; you may need them later. This step creates room for the spring mechanism.
Marking Spring Placement
Next, decide where to place the spring inside the glove. Use a pencil or fabric marker to mark the spot. The spring should sit where your fist hits the target.
Mark both inside and outside of the glove. This helps align the spring properly during assembly. Accurate marking prevents the spring from shifting or causing discomfort.
Choosing The Right Spring
Choosing the right spring is key to making a spring loaded boxing glove. The spring controls how fast and hard the glove moves. Picking the correct spring helps you build a glove that feels right and works well. You need to know about different spring types and how spring size and tension affect the glove’s performance.
Spring Types
There are several spring types to choose from. Coil springs are common. They compress and release energy smoothly. Torsion springs twist and provide a strong snap back. Extension springs stretch and pull back to their original shape. Choose a spring type based on how you want your glove to react. Coil springs offer steady force. Torsion springs give a quicker return. Extension springs have more pull power.
Spring Size And Tension
Spring size affects how much force it can hold. Larger springs store more energy and give stronger punches. Smaller springs are lighter but less powerful. Tension is the spring’s tightness. Higher tension means the spring pushes back harder. Low tension springs are softer and easier to move. Pick a size and tension that match your strength and glove design. Balance power and control for the best feel.
Credit: www.youtube.com
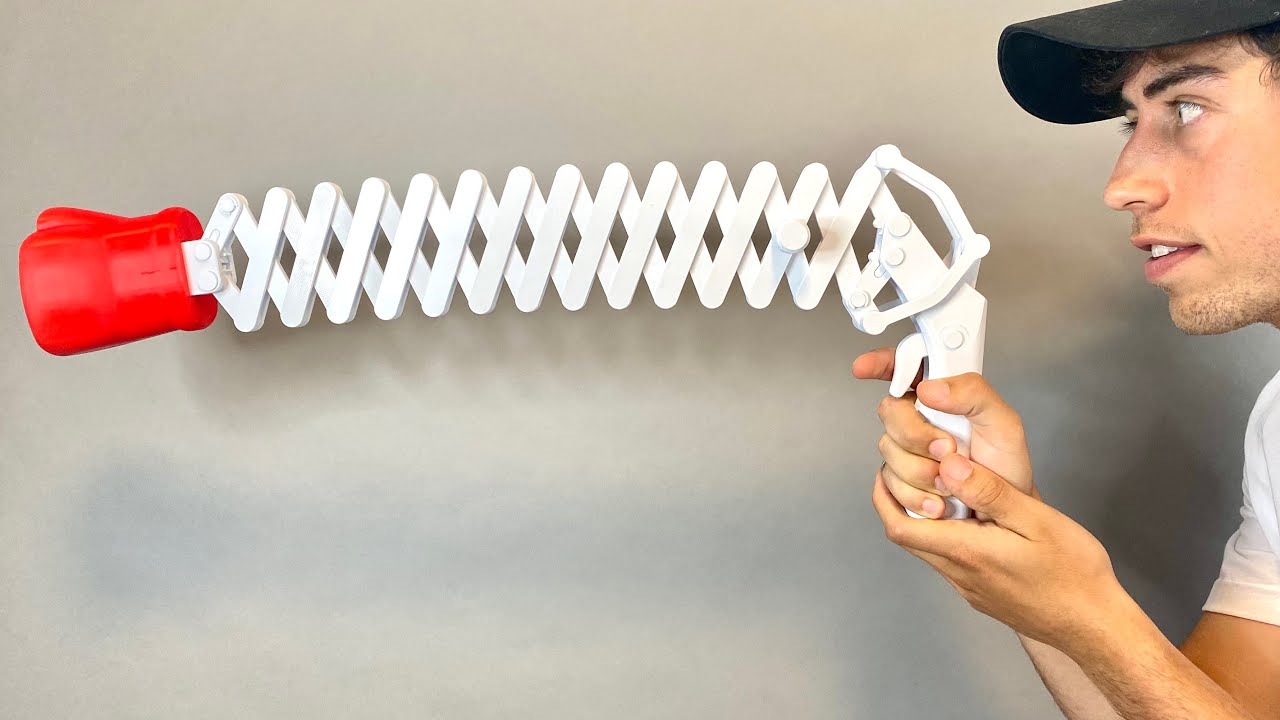
Installing The Spring
Installing the spring is a key step in making a spring loaded boxing glove. The spring gives the glove its bouncing power. It must be fixed well inside the glove to work correctly. Follow these steps carefully for a strong and safe fit.
Attaching To Glove Interior
First, open the glove’s interior space. Find the spot where the spring will sit. Use strong glue or sewing to attach one end of the spring. Make sure it is tight and won’t move. The spring should lie flat inside the glove to avoid bumps.
Check that the spring does not poke through the glove’s padding. The padding protects your hand and keeps the spring hidden. Secure the spring firmly so it can handle repeated punches without falling loose.
Securing Mechanism
Next, add a securing mechanism to hold the spring in place. Use straps, clamps, or stitches around the spring’s base. This stops the spring from shifting during use. It also improves safety by keeping the spring from coming out.
Test the spring’s movement after securing it. It should compress and release smoothly. Adjust the securing method if the spring feels loose or too tight. A good fit means the glove will work well and last longer.
Testing The Mechanism
Testing the mechanism is a key step in making a spring loaded boxing glove. It ensures the glove works smoothly and safely. This step helps find any problems before using the glove. Careful testing improves performance and user safety.
Safety Checks
Start with a full safety check before testing the spring. Look for loose parts or sharp edges. Make sure all screws and bolts are tight. Check the glove padding for damage. Wear protective gloves to avoid injury. Test the glove slowly to feel how the spring reacts. Stop immediately if anything feels wrong or unsafe.
Adjusting Spring Tension
Adjust the spring tension to control the glove’s force. Turn the tension screw little by little. Test the glove after each adjustment. Find the balance between too soft and too hard. The glove should return smoothly without being too stiff. This step improves comfort and performance during use.

Credit: somethingaweek.wordpress.com
Final Assembly
The final assembly stage brings all parts of the spring-loaded boxing glove together. This step is crucial for both comfort and function. Proper assembly ensures the glove feels right and works smoothly. Focus on reinserting the padding carefully and sealing the glove tightly.
Reinserting Padding
Place the padding back inside the glove carefully. Align it to cover all impact areas. Make sure the padding sits flat and does not bunch up. Check the spring placement to keep it in the correct spot. This step helps protect your hand during use. Take your time to avoid shifting the padding.
Sealing The Glove
Use strong thread or glue to close the glove opening. Secure all edges to prevent padding from moving. A tight seal keeps the glove shape firm and neat. Test the glove by pressing it lightly to feel the spring action. Fix any loose spots before final use. A well-sealed glove lasts longer and performs better.
Tips For Use And Maintenance
Using and maintaining a spring loaded boxing glove properly keeps it working well for a long time. Simple care steps protect the spring and glove parts. Follow these tips to ensure safety and durability.
Safe Handling
Always wear the glove carefully to avoid injuries. Avoid swinging the glove too hard or at close range. Keep the glove away from children without supervision. Store it in a dry place to stop rust and damage. Check for loose parts before each use.
Spring Care
Keep the spring clean and dry to stop rust. Use a small brush to remove dirt or dust. Apply a drop of light oil to the spring now and then. Do not stretch the spring beyond its normal range. Replace the spring if it loses strength or bends.
Troubleshooting Common Issues
If the glove does not bounce back, check the spring for damage. Tighten any screws or bolts that become loose. If the glove feels stiff, clean and oil the spring. Replace worn parts to keep the glove working well. Test the glove gently after any fix.
Frequently Asked Questions
What Materials Are Needed For A Spring Loaded Boxing Glove?
You need a boxing glove, a strong spring, screws, a small platform, and basic tools. These materials ensure proper function and durability of the spring loaded boxing glove.
How Do You Attach The Spring To The Boxing Glove?
Attach the spring securely to the glove’s wrist area using screws and a small platform. This provides stability and allows the glove to spring back effectively.
Can I Customize The Spring Tension?
Yes, you can adjust spring tension by choosing different spring sizes or adding tension screws. This customization affects how strong or soft the spring action feels.
Is This Glove Safe For Training And Sparring?
The spring loaded glove is best for light training and reflex practice. It may not be safe for intense sparring due to the spring mechanism.
Conclusion
Making a spring loaded boxing glove is fun and simple. You just need basic tools and materials. Follow the steps carefully to build it right. This project helps you learn about springs and mechanics. Testing your glove shows how well it works.
Keep practicing to improve your design. Enjoy creating and using your homemade boxing glove. It’s a great way to explore DIY skills and have fun. Try making one today and see the results yourself.