If you need to remove the glove box in your 2008 Impala, you might be wondering where to start and how to do it without causing damage. Whether you’re fixing a problem inside or just want better access to the cabin filter, this task can seem tricky at first.
But don’t worry—by the end of this guide, you’ll have clear, simple steps to get the job done quickly and safely. Keep reading, and you’ll save time and avoid costly mistakes while working on your car.
Tools Needed
Removing the glove box from a 2008 Impala is easier with the right tools. Having the correct tools saves time and prevents damage. These tools help you work safely and efficiently.
Phillips Head Screwdriver
A Phillips head screwdriver is essential for removing screws. Many glove boxes use Phillips screws to hold them in place. Choose a medium-sized screwdriver for a good fit.
Flat Head Screwdriver
A flat head screwdriver helps pry open clips or panels gently. It is useful for releasing the glove box without scratching surfaces. Use it carefully to avoid damage.
Socket Wrench Set
A socket wrench set is needed to remove bolts securing the glove box. Common sizes include 7mm and 10mm sockets. A ratchet handle makes the job quicker and easier.
Trim Removal Tool
A trim removal tool helps remove plastic panels without breaking them. It is safer than using metal tools for clips and trims. This tool protects your car’s interior parts.
Flashlight
A flashlight brightens the glove box area for better visibility. It helps you see screws and clips in dark spaces. Choose a small, handheld flashlight for convenience.
Prepare The Area
Start by clearing items from the glove box and surrounding area. Make sure the car is off and keys are out. This prevents damage and keeps the workspace safe.
Clear The Glove Box Area
Start by emptying everything inside the glove box. Remove papers, tools, and small items. This prevents damage and makes the removal easier. A clean space helps you work faster and safer.
Gather Necessary Tools
Collect the tools needed for the job. Usually, a screwdriver and a socket wrench work best. Having tools ready saves time and avoids frustration during the process.
Protect The Car Interior
Place a soft cloth or towel under the glove box area. This protects your car’s interior from scratches. It also catches any screws or parts that might fall during removal.
Ensure Good Lighting
Work in a well-lit area or use a portable light. Clear visibility helps you find screws and clips easily. It lowers the chance of mistakes or lost parts.
Empty The Glove Box
Emptying the glove box is the first step to remove it from your 2008 Impala. Clearing out everything inside makes the process easier and safer. It also prevents damage to your items and the glove box itself.
Take out all papers, manuals, and small objects carefully. Some items may fall out if you open the glove box fully. A clean, empty space helps you see all screws and clips clearly.
Open The Glove Box Fully
Push the glove box latch to open it wide. This gives full access to the inside. Hold it steady to avoid dropping anything.
Remove Loose Items
Take out all loose items like receipts, pens, and cards. Place them somewhere safe to avoid losing them.
Take Out Manuals And Documents
Pull out the vehicle manual and any other documents stored inside. Keep them in a folder to stay organized.
Check For Hidden Objects
Look inside corners and pockets for small items. Remove any coins or accessories before moving on.

Credit: www.youtube.com
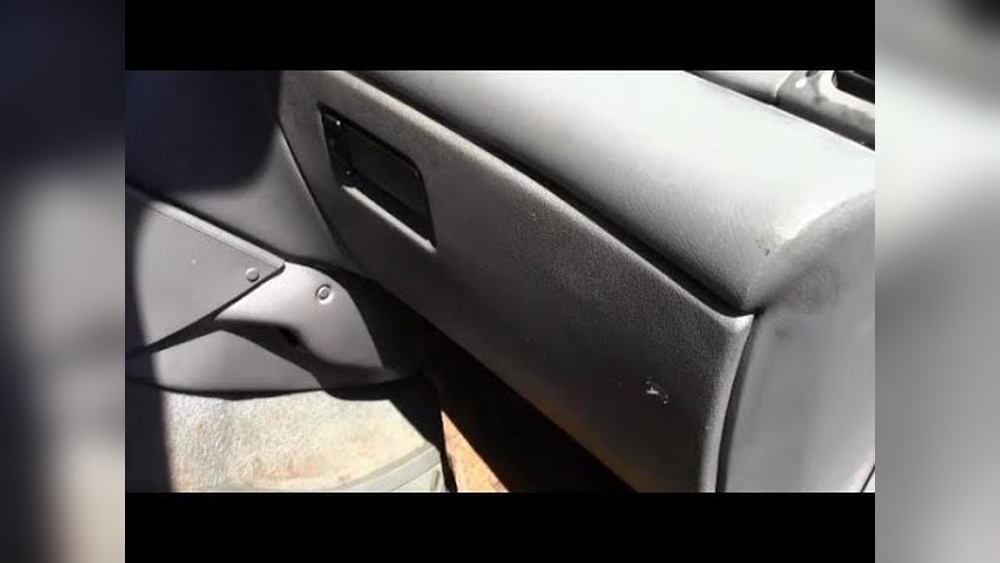
Locate The Fasteners
Locating the fasteners is the first step to removing the glove box on a 2008 Impala. Fasteners hold the glove box in place. You must find them to safely remove the glove box without damage.
Fasteners can be screws, bolts, or clips. They are usually hidden inside or along the edges of the glove box. Knowing their exact location makes the removal process faster and easier.
Check Inside The Glove Box
Open the glove box fully. Look on the sides and bottom for screws or clips. These fasteners keep the glove box door attached to the frame. Use a flashlight if needed.
Inspect The Glove Box Frame
Look around the glove box opening on the dashboard. Fasteners might be behind small plastic covers. Gently pry off the covers to see the screws or bolts underneath.
Look Underneath The Glove Box
Some fasteners are under the glove box. Use your hand or a mirror to check this area. Removing these fasteners helps release the glove box from the dash.
Remove The Screws
Removing the screws is a key step in taking out the glove box of a 2008 Impala. These screws hold the glove box firmly in place. Taking them out carefully lets you access the inside parts easily. Use the right tools to avoid damage.
Locate all screws before starting to remove them. Some screws might be hidden behind small covers or panels. Check the edges and inside the glove box to find every screw. Missing one can cause trouble when removing the glove box.
Gather The Right Tools
Prepare a screwdriver that fits the screws perfectly. Most screws in the glove box are Phillips head. Using the wrong tool can strip the screws and make removal hard. Have a small flashlight ready to see inside tight spots.
Locate All The Screws
Open the glove box fully and look for screws along the sides. Check the bottom edge and the back panel. Some screws might be hidden under rubber mats or small plastic covers. Remove covers gently to avoid breaking them.
Unscrew Carefully
Turn each screw counterclockwise to loosen it. Keep a firm grip on the screwdriver for control. Remove screws slowly to avoid dropping them inside the dashboard. Place screws in a small container to keep them safe.
Check For Additional Fasteners
Some glove boxes have extra clips or bolts inside. After removing screws, gently pull the glove box to check if it moves freely. If it feels stuck, look again for hidden fasteners. Removing all fasteners prevents damage during removal.
Detach The Glove Box
Removing the glove box from a 2008 Impala is straightforward. This step lets you access parts behind it. You need to handle the glove box carefully to avoid damage. Follow these clear steps to detach it properly.
Open The Glove Box Fully
Start by opening the glove box door all the way down. This gives you full access to the inside. Make sure nothing is inside the glove box. Empty it to prevent items from falling out during removal.
Release The Damper Arm
Look for the small damper arm on the right side. This arm controls the slow closing of the glove box. Gently unclip it from the glove box. Use your fingers or a flat tool if needed. Be careful not to break the clip.
Push In The Side Walls
Press the sides of the glove box inward. This action frees the stops that hold the glove box in place. You will feel the glove box become loose. Keep pushing evenly on both sides.
Lower And Remove The Glove Box
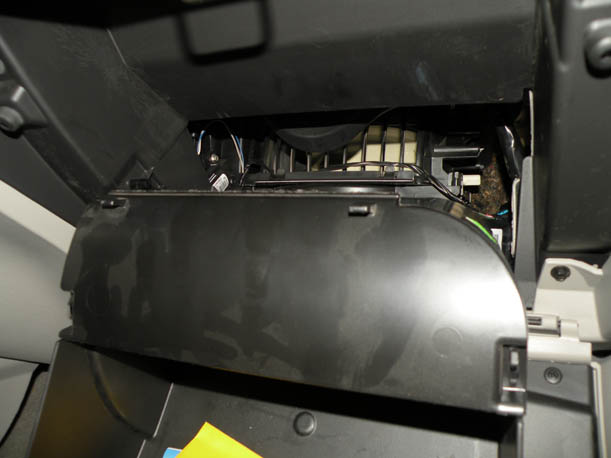
Once the stops are free, gently lower the glove box down. Pull it out slowly from the dashboard. If it feels stuck, check for any remaining clips or screws. Removing the glove box fully exposes the area behind it.
Disconnect Electrical Connectors
Disconnecting the electrical connectors is a key step in removing the glove box of a 2008 Impala. These connectors power features like the glove box light and air vent. Handling them carefully prevents damage to the wiring and ensures safety.
Before unplugging, check each connector’s position and shape. This helps avoid confusion during reassembly. Use gentle pressure to release clips or tabs holding the connectors in place.
Locate The Electrical Connectors Behind The Glove Box
Open the glove box fully to access its back panel. Look for wires leading into the glove box area. The connectors usually attach near the light bulb or vent controls.
Identify The Connector Release Mechanisms
Most connectors have small tabs or clips. Press or lift these gently to unlock the connector. Avoid pulling wires directly to prevent damage.
Gently Disconnect Each Connector
Hold the connector housing firmly. Pull it straight out without twisting. If it resists, double-check for hidden clips or locks.
Secure Loose Wires After Disconnection
After unplugging, move wires aside carefully. Use tape or a soft cloth to keep them safe. This prevents snagging during glove box removal.
Credit: www.howtoalmanac.com
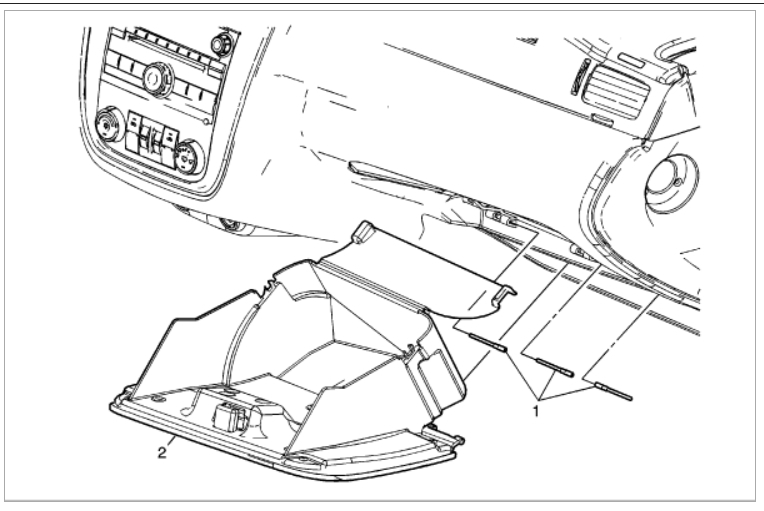
Remove The Glove Box Assembly
Removing the glove box assembly from a 2008 Impala is simple. This step helps you access parts behind the dashboard or fix glove box issues. Follow clear steps to avoid damage and save time.
Keep tools ready and work carefully. The glove box assembly includes the door and the inner compartment. Removing it lets you reach fuses, wiring, and other components.
Open And Empty The Glove Box
Start by opening the glove box door fully. Take out all items inside. An empty glove box makes the process easier and safer.
Detach The Glove Box Stops
Locate the stops on each side of the glove box. These stops keep the door from falling out. Gently press or pull the stops to release them. This lets the glove box swing down.
Remove The Glove Box Damper
Find the damper arm on the right side of the glove box. This small arm controls the door’s smooth movement. Carefully unclip the damper from the glove box door. Set it aside without forcing.
Unscrew The Glove Box Assembly
Look for screws inside the glove box frame. Use a screwdriver to remove all screws. Keep screws safe for reassembly. After unscrewing, the glove box assembly will be free to pull out.
Pull Out The Glove Box Assembly
Grip the glove box assembly firmly. Pull it straight out from the dashboard. Move slowly to avoid breaking clips or wires. Place the removed assembly on a soft surface.
Tips For Reinstallation
Reinstalling the glove box in a 2008 Impala needs care. Doing it right avoids damage and ensures proper fit. Follow these tips to make the process smooth and safe.
Check All Parts Before Reinstalling
Look at each part closely. Make sure no screws or clips are missing. Replace any broken parts to prevent problems later.
Align The Glove Box Correctly
Fit the glove box in its place carefully. Keep it straight and level. Proper alignment helps the box open and close smoothly.
Tighten Screws Firmly But Gently
Use the right screwdriver for the screws. Tighten them well but do not force. Over-tightening can crack plastic parts.
Test The Glove Box Operation
Open and close the glove box several times. Make sure it locks properly and moves without sticking. Fix any issues before finishing.
Credit: www.2carpros.com
Frequently Asked Questions
How Do I Remove The Glove Box In A 2008 Impala?
To remove the glove box, first open it fully. Detach the damper arm on the right side. Then, press in the sides to release the stops and pull the glove box out carefully.
What Tools Are Needed To Remove The Glove Box?
Generally, no special tools are required. Sometimes, a Phillips screwdriver may be needed to remove screws if present. Most glove boxes in a 2008 Impala can be removed by hand.
How Long Does It Take To Remove The Glove Box?
Removing the glove box usually takes about 5 to 10 minutes. It is a quick process once you know the steps and have no obstructions.
Can I Access The Cabin Air Filter After Removing The Glove Box?
Yes, removing the glove box provides access to the cabin air filter behind it. This allows you to replace or inspect the filter easily.
Conclusion
Removing the glove box on a 2008 Impala is simple with the right steps. Take your time and follow each part carefully. Use basic tools and stay safe. This guide helps you save time and avoid mistakes. Now you can access the space behind the glove box easily.
Keep this method in mind for future car work. Small tasks like this build your confidence. Try it yourself and see how easy it can be.


