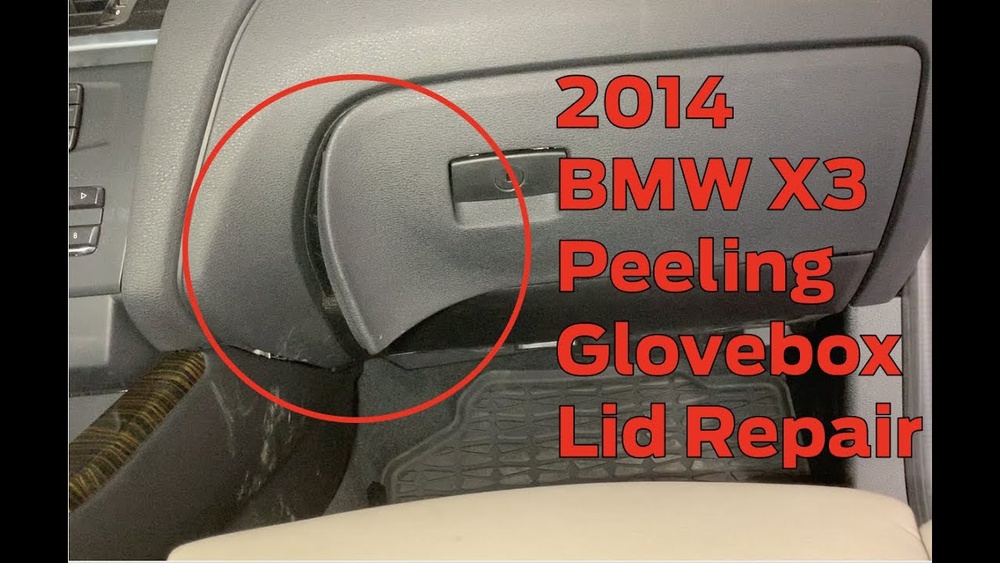
Is your BMW X3’s glove box peeling and ruining the interior look of your car? You’re not alone, and the good news is you don’t have to live with it or spend a fortune on repairs.
Whether it’s the peeling veneer or worn-out lining, fixing it yourself can save you time and money while restoring that sleek, clean finish you expect from your BMW. In this guide, you’ll discover simple, effective steps to stop the peeling and bring your glove box back to life.
Keep reading—your car’s interior will thank you!
Causes Of Glove Box Peeling
The glove box peeling in a BMW X3 can be frustrating and unsightly. Understanding the causes helps to address the problem effectively. Peeling often results from a mix of factors that wear down the glove box surface over time. Identifying these causes can guide the repair process and prevent future damage.
Common Wear Factors
Repeated use causes stress on the glove box material. Opening and closing it many times wears down the surface. Items stored inside can rub against the lining, causing scratches and peeling. Over time, these small damages add up and lead to visible peeling.
Physical impact or pressure also weakens the glove box surface. Heavy or sharp objects can create dents or cracks. These injuries break the protective layer, allowing peeling to start.
Environmental Effects
Sunlight exposure causes fading and drying of the glove box material. UV rays weaken the surface, making it brittle and prone to peel. Heat inside the car worsens this effect by expanding and contracting the material.
Humidity and moisture also harm the glove box. Water can seep into cracks and cause swelling or warping. This moisture breaks down adhesives and layers, resulting in peeling over time.
Material Quality Issues
The quality of materials used in the BMW X3 glove box affects its durability. Low-grade plastics or vinyl are more likely to peel. Poor manufacturing or weak bonding between layers speeds up the damage.
Some older models used materials that degrade faster under stress. This leads to early peeling compared to newer models with improved materials. Understanding the role of material quality helps in choosing proper repair methods.
Tools And Materials Needed
Fixing the peeling on your BMW X3 glove box requires the right tools and materials. Having everything prepared makes the process smoother. It also helps you get a clean and lasting repair. Below are the main items you will need for the job.
Cleaning Supplies
Start with cleaning supplies to remove dirt and grease. Use mild soap and water to clean the surface. A soft cloth or microfiber towel works best to avoid scratches. Rubbing alcohol helps remove stubborn residues. Make sure the area is dry before moving on.
Repair Kits And Adhesives
Repair kits are essential for filling and fixing peeled areas. Look for plastic or vinyl repair kits designed for car interiors. These often include fillers and color compounds to match your glove box. Strong adhesives like contact cement or epoxy glue help reattach peeling sections securely.
Sanding And Polishing Tools
Sandpaper with fine grit smooths rough or peeling edges. Use gentle sanding to avoid damaging the glove box further. Polishing compounds restore shine and blend repairs with the original surface. Use a soft buffing pad or microfiber cloth for polishing.
Preparing The Glove Box Surface
Preparing the glove box surface is the first step to fixing peeling on your BMW X3. A clean and smooth surface helps new materials stick better. It also prevents dirt or loose parts from causing more damage. Taking time to prepare the glove box improves the repair’s durability and appearance.
Cleaning And Drying
Start by wiping the glove box with a soft cloth. Use mild soap and water to remove dust and grime. Avoid harsh chemicals that can damage the plastic. After cleaning, dry the surface completely. Moisture can stop adhesives from working properly. Use a dry cloth or let it air dry for a few minutes.
Removing Loose Peeling Material
Carefully peel off all loose or flaking material. Use your fingers or a plastic scraper to avoid scratches. Removing all loose parts creates a stable base for repairs. If small flakes remain, gently sand the edges to smooth the surface. This step prevents the peeling from spreading again.
Fixing Light Peeling And Scratches
Light peeling and scratches on your BMW X3 glove box can spoil the interior’s look. These issues often happen from daily use or minor bumps. Fixing them early keeps the glove box neat and prevents further damage. Simple tools and careful steps can restore the surface without professional help.
Using Mild Abrasives
Start by cleaning the glove box surface with a soft cloth. Use a mild abrasive like toothpaste or baking soda mixed with water. Apply a small amount on a damp cloth and rub gently in circles over the peeling or scratched area. This method removes light marks without harming the plastic.
A magic eraser also works well for minor scuffs. Dampen it slightly and rub softly. Avoid pressing too hard to prevent extra scratches. Always wipe the area clean with a fresh cloth after treatment to remove residue and check progress.
Applying Heat For Smoothing
Heat can soften the peeling edges and smooth scratches. Use a heat gun or hairdryer on low heat. Keep the tool moving constantly to avoid melting the plastic. Gently warm the area until the peeling softens and flattens.
After heating, press the softened surface lightly with a flat tool or cloth to smooth it out. Let the glove box cool naturally before touching again. This method works well for minor peeling and shiny marks caused by scratches.
Repairing Deep Peeling And Damage
Repairing deep peeling and damage on your BMW X3 glove box requires careful steps. This ensures a smooth and durable finish. Start by preparing the surface properly. Removing loose material and smoothing rough edges helps the repair materials stick better. Each step builds a stronger base for the next.
Use the right tools and products for lasting results. Deep peeling often means the plastic or vinyl layer has lifted or cracked. Filling gaps and sealing damaged areas restores the glove box’s look and function. Follow these detailed methods to fix serious damage effectively.
Sanding Techniques
Begin by sanding the peeling area with fine-grit sandpaper. Use 400 to 600 grit for best results. Sand gently to remove loose flakes and smooth edges. Avoid pressing too hard to prevent further damage. Wipe off dust with a clean cloth before continuing. Sanding creates a smooth base for fillers or repair compounds.
Using Plastic Repair Kits
Plastic repair kits work well for cracks and holes. These kits usually include a filler, spreader, and sometimes a primer. Follow the instructions carefully. Apply the filler evenly into damaged spots. Let it dry completely before sanding again. This step restores strength and shape to the glove box surface. Choose a kit designed for automotive plastics for best adhesion.
Filling And Sealing Gaps
Fill gaps or deep scratches with a flexible sealant or vinyl repair compound. Use a small spatula or your finger to press the material into cracks. Smooth the surface as much as possible. Allow the filler to cure fully, usually several hours. After curing, sand lightly to even out the texture. Sealing gaps prevents moisture from causing more peeling or damage.
Credit: x3.xbimmers.com
Finishing Touches
Finishing touches play a key role in restoring your BMW X3 glove box. After repair steps, these final actions ensure a smooth, lasting result. Proper finishing improves appearance and protects the surface from future damage. Follow these simple techniques to complete your glove box restoration with a professional look.
Polishing The Surface
Polishing removes minor scratches and smooths the repaired area. Use a fine polishing compound and a soft microfiber cloth. Apply the compound in small amounts. Rub gently in circular motions until the surface shines evenly. Avoid harsh pressure to prevent new scratches. This step helps blend the repair with the rest of the glove box.
Applying Protective Coatings
Protective coatings shield the glove box from peeling and wear. Choose a plastic-safe sealant or a clear coat spray. Apply thin, even layers over the polished area. Let each layer dry fully before adding another. This barrier guards against moisture and UV damage. Protective coatings keep your glove box looking fresh longer.
Maintenance Tips To Prevent Peeling
Proper care helps keep the BMW X3 glove box from peeling. Small steps make a big difference. Follow simple habits to protect the glove box surface. These tips save you time and money on repairs.
Regular Cleaning Routine
Clean the glove box often using a soft cloth. Dust and dirt can wear down the surface. Use gentle wiping motions to avoid scratches. Keep the glove box free from grime and oils. This prevents buildup that causes peeling.
Avoiding Harsh Chemicals
Choose mild cleaners designed for car interiors. Harsh chemicals break down the glove box material. Avoid bleach, ammonia, and strong solvents. These damage the finish and cause peeling. Test cleaners on a small area first.
Controlling Interior Humidity
Moisture weakens the glove box glue and material. Use a dehumidifier or moisture absorber in the car. Keep windows closed in rain or snow. Avoid leaving wet items inside the glove box. Proper humidity control stops peeling before it starts.

Credit: www.youtube.com

Credit: www.reddit.com
Frequently Asked Questions
What Is The Most Common Problem With The Bmw X3?
The most common problem with the BMW X3 is coolant leaks caused by a faulty water pump. This issue can lead to engine overheating.
Does The Bmw X3 Have A Glove Compartment?
Yes, the BMW X3 includes a glove compartment for convenient storage. It offers easy access and ample space for essentials.
How To Fix Scratches On Glove Compartment?
Clean the area first. Use toothpaste or a magic eraser for light scratches. Sand deeper scratches gently, then apply polishing compound. For severe damage, try a plastic repair kit. Finish with a protective coating to prevent future marks. Always test products on a small spot first.
How To Remove Bmw X3 Load Cover?
To remove the BMW X3 load cover, unlatch both sides near the rear seats. Then, lift and pull the cover backward carefully to detach it. Store the cover safely to avoid damage.
Conclusion
Fixing your BMW X3 glove box peeling is simple with these steps. Clean the area well before starting repairs. Use gentle methods for light peeling and stronger ones for deep damage. Take your time and work carefully to avoid more harm.
Regular care can keep your glove box looking new longer. Small fixes now save you from costly repairs later. Enjoy your car’s interior with a smooth, clean glove box again.