
Are your bike grips slipping or uncomfortable? Installing lock-on bike grips can change the way you ride by giving you a secure, comfortable hold every time.
If you’ve ever struggled with loose grips or sweaty hands, this simple upgrade is exactly what you need. In this guide, you’ll learn step-by-step how to install lock-on grips quickly and easily, even if you’re not a bike expert. Keep reading, and by the end, you’ll be ready to ride with confidence and control like never before.
Credit: www.parktool.com
Choosing The Right Lock-on Grips
Choosing the right lock-on grips is important for a comfortable ride. The grips affect how well you control your bike and how your hands feel. Picking grips that suit your riding style and bike type makes a big difference. Consider the type, material, and size before buying. This helps you find grips that fit perfectly and feel good.
Types Of Lock-on Grips
Lock-on grips come in different styles. Some have smooth surfaces, while others have patterns for better hold. Some grips are thick for more cushioning. Others are thin for a close connection to the handlebars. Choose a type that matches your riding style and terrain. For example, thicker grips work well for rough trails. Thin grips suit road biking better.
Material And Comfort
The material of the grip affects comfort and durability. Rubber grips offer good shock absorption. Silicone grips feel soft and last long. Foam grips are lightweight but wear out faster. Some grips combine materials for better performance. Soft materials reduce hand fatigue on long rides. Harder materials last longer but may feel less comfortable.
Grip Size And Compatibility
Grip size matters for hand comfort and control. Measure your handlebar diameter before buying grips. Most lock-on grips fit standard bars, but some fit wider bars. Choose a grip size that feels natural in your hands. Too small or too large grips can cause discomfort. Check if the lock-on clamps match your handlebar size too.
Tools Needed For Installation
Installing lock-on bike grips is a simple process. Having the right tools makes the job easier and faster. This section covers the basic tools you need to complete the installation smoothly. Using these tools helps avoid damage to your bike and grips.
Essential Tools List
- Allen wrench set – for loosening and tightening bolts
- Screwdriver – usually a Phillips head for some grip clamps
- Rubbing alcohol or cleaning solution – to clean the handlebar surface
- Clean cloth or rag – to wipe off dirt and grease
- Rubber mallet (optional) – to gently tap grips into place if needed
Safety Gear Recommendations
- Protective gloves – prevent cuts and improve grip on tools
- Safety glasses – protect your eyes from dust or debris
- Work apron or old clothes – keep your clothes clean during installation
Preparing Your Bike
Preparing your bike before installing lock-on grips is important. It helps the new grips fit well and last longer. Taking time to get the handlebars ready makes the whole process easier and cleaner.
Two key steps are removing old grips and cleaning the handlebar surface. Both tasks ensure the new grips stick firmly and do not slip during rides.
Removing Old Grips
Start by pulling the old grips off the handlebars. If they are tight, use rubbing alcohol or soapy water to loosen them. Spray a small amount under the grips and twist while pulling. Avoid cutting the grips unless you plan to throw them away.
Take care not to damage the handlebar or brake levers. Removing old grips carefully helps keep your bike ready for the new set.
Cleaning The Handlebar Surface
Next, clean the handlebar surface completely. Use a cloth with rubbing alcohol to remove dirt, grease, and leftover glue. A clean surface helps the lock-on clamps tighten properly.
Make sure the handlebars dry fully before installing the new grips. This step prevents slipping and improves grip security.
Installing Lock-on Grips
Installing lock-on bike grips is simple and quick. These grips provide a secure hold and prevent slipping. Follow these steps to fit them properly on your handlebars.
Positioning The Grips
Start by sliding the grip onto the handlebar. Adjust it until it feels comfortable. Make sure the grip covers the bar end completely. Position the grip so your fingers rest naturally on it.
Tightening The Locking Clamps
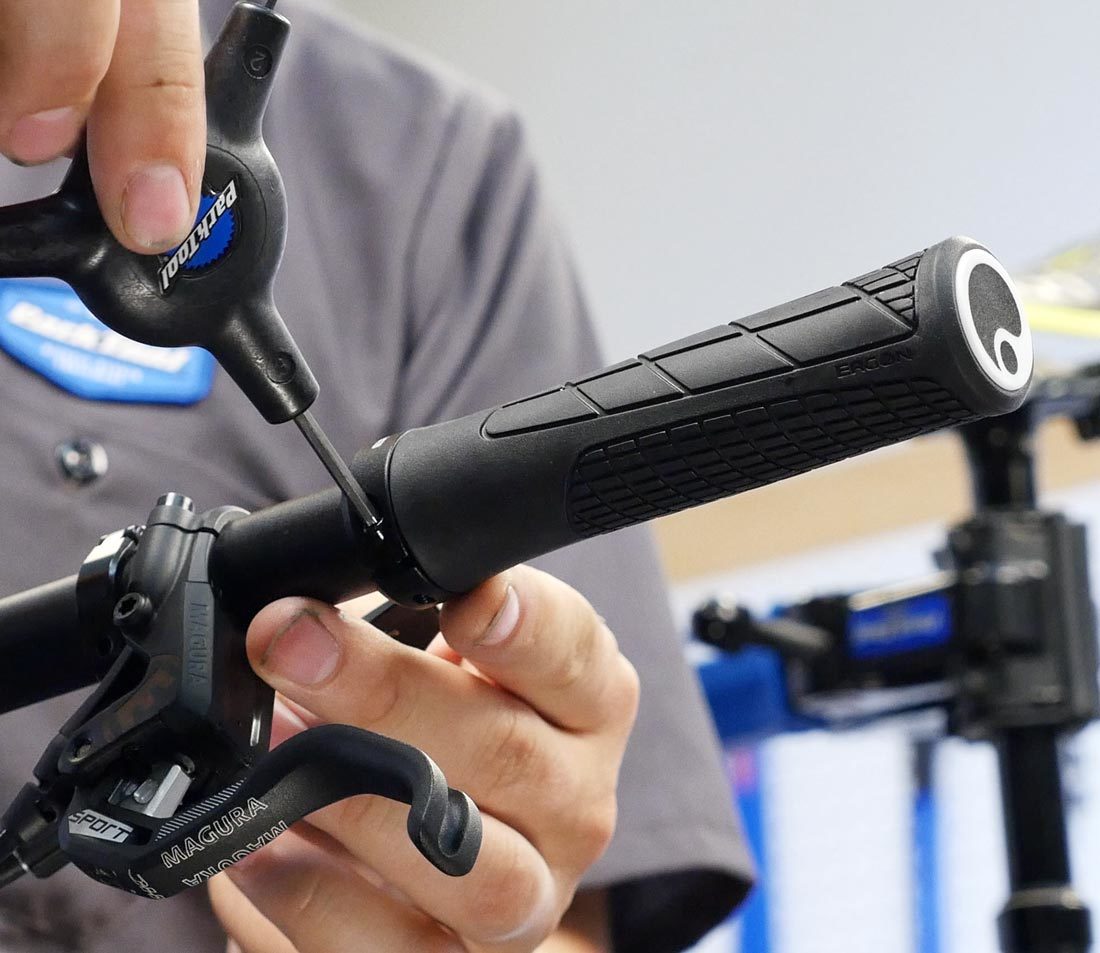
Locate the small clamps on each grip end. Use a suitable Allen key to tighten them. Turn the key slowly until the grip feels tight. Avoid over-tightening to prevent damage to the clamp or handlebar.
Checking Grip Security
Give each grip a strong twist. It should not move or slide on the handlebar. Test your grip by holding the bars firmly. If the grips move, tighten the clamps a bit more. Secure grips improve control and safety while riding.
Tips For A Long-lasting Fit
Ensuring your lock-on bike grips fit well and last long requires some key steps. Proper care and correct installation help keep grips tight and comfortable. These tips will guide you to maintain a strong, secure fit for your bike grips.
Regular Maintenance
Check your grips often for any signs of wear or looseness. Clean them with a damp cloth to remove dirt and sweat. Avoid using harsh chemicals that can damage the material. Tighten the lock rings if they feel loose. This prevents slipping and keeps your hands steady on the bike.
Avoiding Common Installation Mistakes
Do not force the grips onto the handlebar without proper alignment. Make sure the lock rings are fully tightened but not over-tightened. Over-tightening can damage the grip or handlebar. Use the right tools to avoid slipping or stripping the screws. Clean the handlebar before installing grips to remove oils or dirt. This step helps the grips stay secure and last longer.

Credit: www.youtube.com

Credit: funnmtb.com
Frequently Asked Questions
What Tools Do I Need To Install Lock-on Bike Grips?
You need an Allen wrench, rubbing alcohol, and a clean cloth. These tools help remove old grips and secure new lock-on grips properly.
How Do Lock-on Bike Grips Improve Riding Comfort?
Lock-on grips provide a secure hold, reducing hand fatigue. They prevent slipping and enhance control during rides, improving overall comfort.
Can I Install Lock-on Grips Without Removing Old Grips?
It’s best to remove old grips for a clean fit. Lock-on grips require a clear handlebar surface for proper locking and safety.
How Tight Should Lock-on Grips Be Installed?
Tighten the lock rings firmly but avoid over-tightening. Proper tightness ensures grips don’t slip without damaging the handlebar or grip.
Conclusion
Installing lock-on bike grips is simple with clear steps. Take your time to align the grips correctly. Tighten the screws evenly to keep them secure. Test the grips before your next ride for safety. Clean your handlebars to remove dirt and oil.
Use the right tools to avoid damage. Enjoy a comfortable and firm hold on your bike. Proper installation helps prevent slipping and improves control. Keep your bike ready for every ride with good grips.


