
Are you ready to create something truly special for your next cake or party? Making fondant boxing gloves might sound tricky, but with the right steps, you can craft these eye-catching decorations yourself.
Imagine the look on your guests’ faces when they see your cake topped with perfectly shaped, colorful boxing gloves made from smooth, edible fondant. Whether you’re celebrating a boxing fan or just want a fun, creative challenge, this guide will walk you through every step.
Keep reading, and you’ll discover how easy and rewarding it is to bring your fondant boxing gloves to life.

Credit: wilsonhand.com
Materials Needed
Before making fondant boxing gloves, gather all the necessary materials. Having the right supplies helps you create neat and detailed gloves. Prepare each item carefully to ensure smooth crafting. This section covers the types of fondant, tools, and coloring options you need.
Fondant Types
Choose soft and pliable fondant for easy shaping. Rolled fondant is popular for smooth surfaces and detail work. Modeling fondant works well for small parts and fine details. Gum paste dries harder, useful for sturdy gloves parts. Pick fondant that suits your skill level and project needs.
Tools And Accessories
Basic tools include a rolling pin and a sharp knife. Use fondant smoothers to create even surfaces. Sculpting tools help form curves and textures on gloves. Silicone molds can speed up shaping details. Toothpicks or small brushes assist in attaching parts with edible glue.
Coloring Options
Gel food colors give bright and vivid shades. Powdered colors work well for subtle tints. Use liquid colors sparingly to avoid fondant stickiness. Edible markers help add fine details and lines. Mix colors carefully to get the perfect boxing glove shade.
Preparing The Fondant
Preparing the fondant is the first step to create realistic boxing gloves. This step ensures the fondant is soft, smooth, and easy to shape. Proper preparation helps the fondant hold its form and color well.
Follow simple methods to get the perfect texture and color for your gloves.
Kneading Techniques
Start by kneading the fondant gently with clean hands. Press and fold it repeatedly to make it soft. Avoid over-kneading, or the fondant may become too sticky. Use a little cornstarch if it sticks to your hands. Knead until the fondant feels smooth and elastic. This makes shaping easier and prevents cracks.
Color Mixing Tips
Choose food coloring that matches boxing gloves. Add color drop by drop to white fondant. Knead the fondant evenly to spread the color. Wear gloves to avoid staining your hands. Mix colors slowly to get the exact shade. Stop when the color looks solid and even. Bright reds or blues work well for classic gloves.
Rolling To Size
Lightly dust your work surface with cornstarch. Roll the fondant to about 1/4 inch thickness. Use a rolling pin to keep it smooth and even. Check the size matches your glove design. Avoid rolling too thin or thick for better shaping. Keep the fondant moving to stop it from sticking. Cut out shapes right after rolling for best results.
Shaping The Gloves
Shaping the fondant boxing gloves is a fun and careful process. This step gives the gloves their realistic look. You work with soft fondant to form the main parts of the glove. Small details make a big difference here. Take your time to shape each piece properly. This section will guide you through shaping the gloves in simple steps.
Creating The Main Shape
Start with a ball of red fondant. Roll it gently into an oval shape. This will be the glove’s body. Press the sides slightly to flatten them. Make sure it looks like a soft pillow. The size depends on your cake or design. Keep the fondant smooth and even. Avoid cracks by kneading the fondant before shaping.
Forming The Thumb
Take a smaller piece of fondant for the thumb. Roll it into a short cylinder. Curve the cylinder to match the glove’s body. Attach the thumb to the side of the main shape. Use a little water to help it stick. Blend the edges where the thumb joins the glove. This creates a natural connection.
Smoothing Edges
Use your fingers or a fondant tool to smooth edges. Press gently to remove any cracks or lines. Smooth edges make the glove look soft and real. Check every side for bumps or rough spots. Smooth fondant also sticks better when attaching parts. Take your time in this step for the best finish.
Adding Details
Adding details to your fondant boxing gloves brings them to life. These small touches make your creation look real and impressive. Focus on simple effects that highlight the glove’s shape and texture. Details create depth and interest. They turn plain shapes into striking designs.
Stitching Effects
Create stitching by using a fine tool or toothpick. Gently press small, even lines along the seams. This mimics real glove stitches. Use a slightly darker fondant or edible paint for contrast. The tiny stitches add authenticity. They make the gloves look hand-stitched and neat.
Lace And Strap Design
Shape thin strips of fondant for the lace and straps. Roll them carefully to keep a consistent thickness. Attach the strips around the wrist area of the glove. Use edible glue to secure the ends. Add small loops or knots to mimic real lace ties. The straps should look tight and functional. This adds realism and detail to your fondant gloves.
Logo And Lettering
Use edible markers or very fine brushes for logos and letters. Keep the design simple and bold for clarity. Write initials or a short word for personalization. Place the logo on a flat surface of the glove. This makes the gloves unique and eye-catching. Clean lines and clear text improve the overall look.
Assembling The Gloves
Assembling the fondant boxing gloves is an exciting step. This part brings all the pieces together. Careful assembly ensures the gloves look realistic and neat. Take your time and follow each step carefully for the best results.
Attaching Parts Securely
Start by joining the main glove parts. Press the edges gently but firmly. Avoid pressing too hard to keep the shape intact. Use small amounts of pressure for a smooth connection. Hold each part together for a few seconds. This helps the fondant stick well. Check that no gaps or cracks appear.
Using Edible Glue
Edible glue works like a strong glue for fondant. Apply a thin layer on the joining surfaces. Use a small brush for precise application. Avoid using too much to prevent soft spots. Press the parts together after applying glue. The glue dries quickly, making the bond firm. This keeps the gloves stable and neat.
Final Adjustments
Look over the gloves for any imperfections. Smooth out small cracks with a damp fingertip. Shape the gloves gently to add a natural curve. Add extra details like stitching lines if desired. Let the gloves dry fully before moving them. This step ensures they keep their perfect shape.
Drying And Setting
Drying and setting fondant boxing gloves is a key step. It ensures your gloves keep their shape and look great. Proper drying helps avoid cracks and dents. It also makes the gloves easier to handle later. Patience is important during this phase. Rushing can damage your hard work.
Optimal Drying Conditions
Keep the fondant in a cool, dry place. Avoid direct sunlight or heat sources. Ideal temperature is around 65-70°F (18-21°C). Airflow should be gentle but steady. Too much humidity slows drying and causes stickiness. Use a fan on low speed if needed.
Avoiding Cracks
Cracks happen when fondant dries too fast or unevenly. Thin parts dry first and pull on thicker areas. To stop cracks, dry gloves slowly and evenly. Cover them loosely with plastic wrap to keep moisture balanced. Handle gloves gently during drying to prevent damage.
Storage Tips
Store finished fondant gloves in an airtight container. Place parchment paper between gloves to stop sticking. Keep them at room temperature, away from heat. Avoid the fridge; it adds moisture and softens fondant. Proper storage keeps gloves fresh for days.
Troubleshooting Common Issues
Making fondant boxing gloves can be fun but challenging. Problems can happen during crafting. Knowing how to fix common issues saves time and stress. Here are some tips for common fondant troubles.
Fondant Cracking
Fondant cracks if it dries too fast or is too dry. Keep fondant soft by adding a little water or shortening. Work quickly and cover unused fondant with plastic wrap. If cracks appear, smooth them with a damp finger or a small brush.
Color Bleeding
Color bleeding happens when colors mix or run. Avoid using liquid food coloring on fondant. Use gel or powder colors instead. Let each color dry fully before adding another. Store finished gloves in a cool, dry place to prevent colors from mixing.
Shape Deformation
Fondant gloves lose shape if fondant is too soft or warm. Chill shaped fondant in the fridge to keep form. Use small supports while drying for better shape. Avoid handling gloves too much after they dry, or they may bend or lose detail.
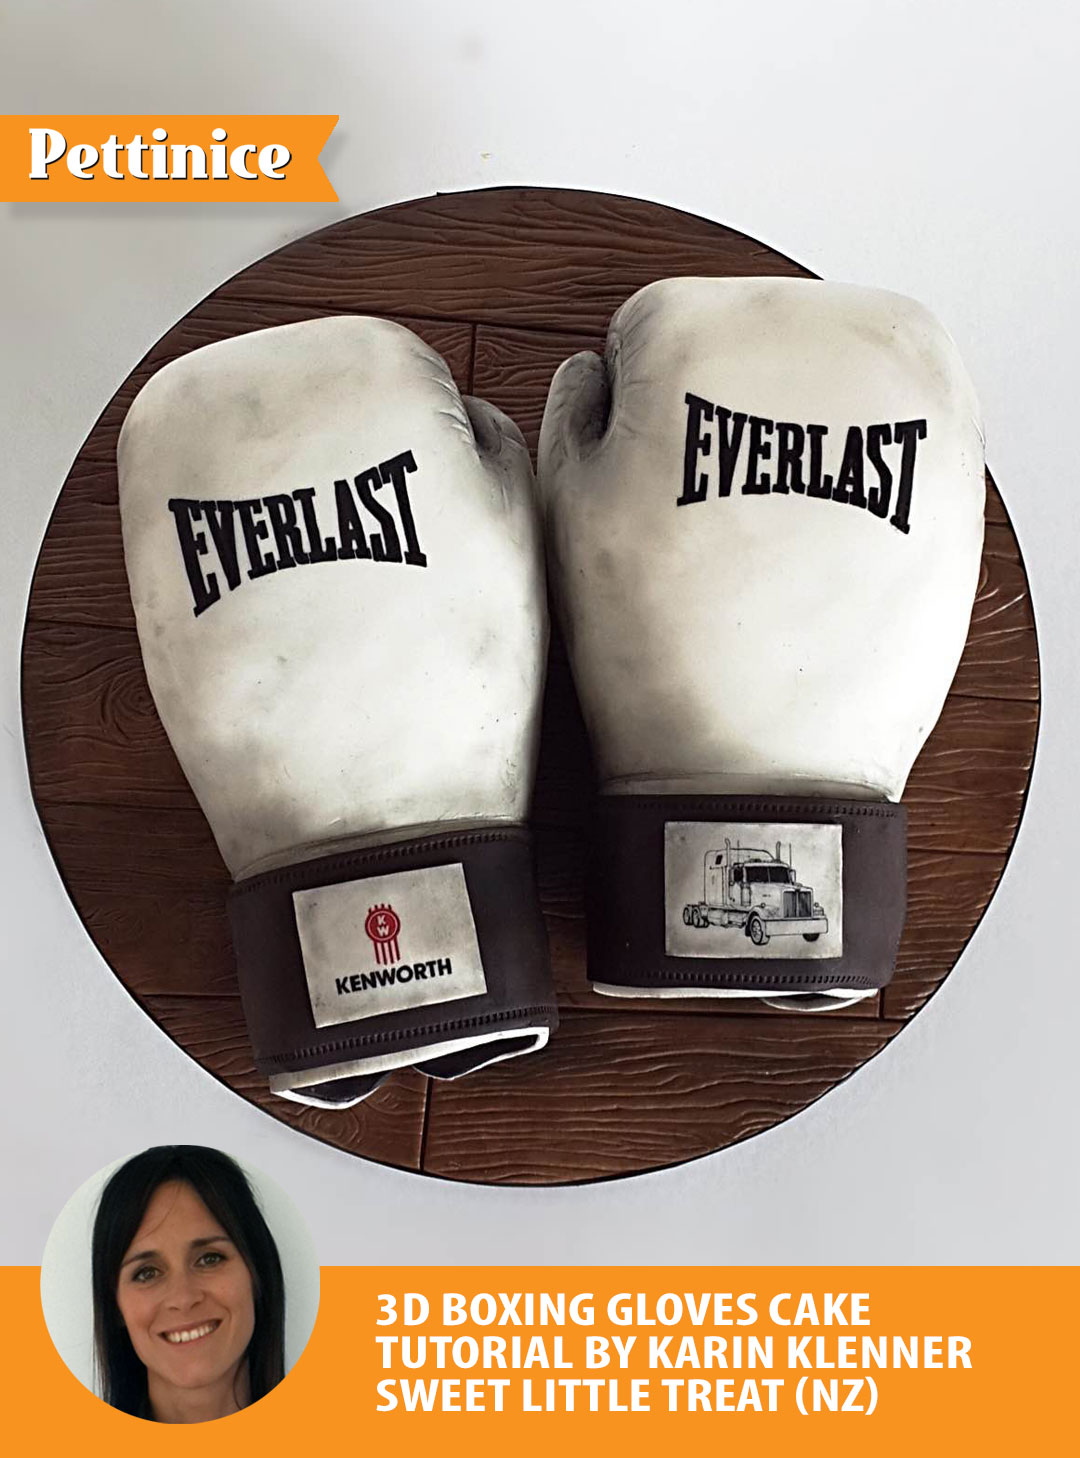
Credit: www.pettinice.com

Credit: www.youtube.com
Frequently Asked Questions
What Materials Are Needed To Make Fondant Boxing Gloves?
To make fondant boxing gloves, you need fondant, edible glue, food coloring, modeling tools, and a rolling pin. These materials help shape and color the gloves accurately for cake decoration.
How Do You Shape Fondant Into Boxing Gloves?
Shape fondant into gloves by molding two oval shapes for the gloves. Attach smaller pieces for details like seams and laces using edible glue. Use modeling tools to refine edges and create realistic textures.
Can I Color Fondant Boxing Gloves Naturally?
Yes, you can color fondant naturally using food-grade powders like beetroot or turmeric. Mix these powders with a small amount of water or vodka before kneading into the fondant to achieve vibrant, natural colors.
How Long Does Fondant Boxing Gloves Decoration Last?
Fondant decorations last up to 1-2 weeks when stored in a cool, dry place. Avoid humidity and direct sunlight to keep the fondant firm and prevent melting or cracking.
Conclusion
Creating fondant boxing gloves is fun and simple. Follow each step with care and patience. Use soft fondant and shape it gently. Add details to make the gloves look real. Practice helps you get better every time. These gloves make great cake decorations for sports fans.
Try this craft for birthdays or special events. Enjoy the process and share your creations proudly. Keep experimenting and have fun with fondant art!


