Is your car’s air feeling stale or dusty? It might be time to change the air filter hidden right behind your glove box.
You don’t need to be a mechanic or spend a fortune at the shop to do this simple maintenance task yourself. In this guide, you’ll learn exactly how to locate, remove, and replace your cabin air filter step-by-step. By following these easy instructions, you’ll breathe fresher air inside your car and keep your HVAC system running smoothly.
Ready to save money and improve your driving comfort? Let’s get started!
Locate The Cabin Air Filter
Locating the cabin air filter is the first step to changing it in your car. This filter keeps the air inside clean by trapping dust and pollen. Many vehicles place this filter behind the glove box for easy access. Knowing where to find the filter saves time and effort during replacement.
Accessing The Glove Box
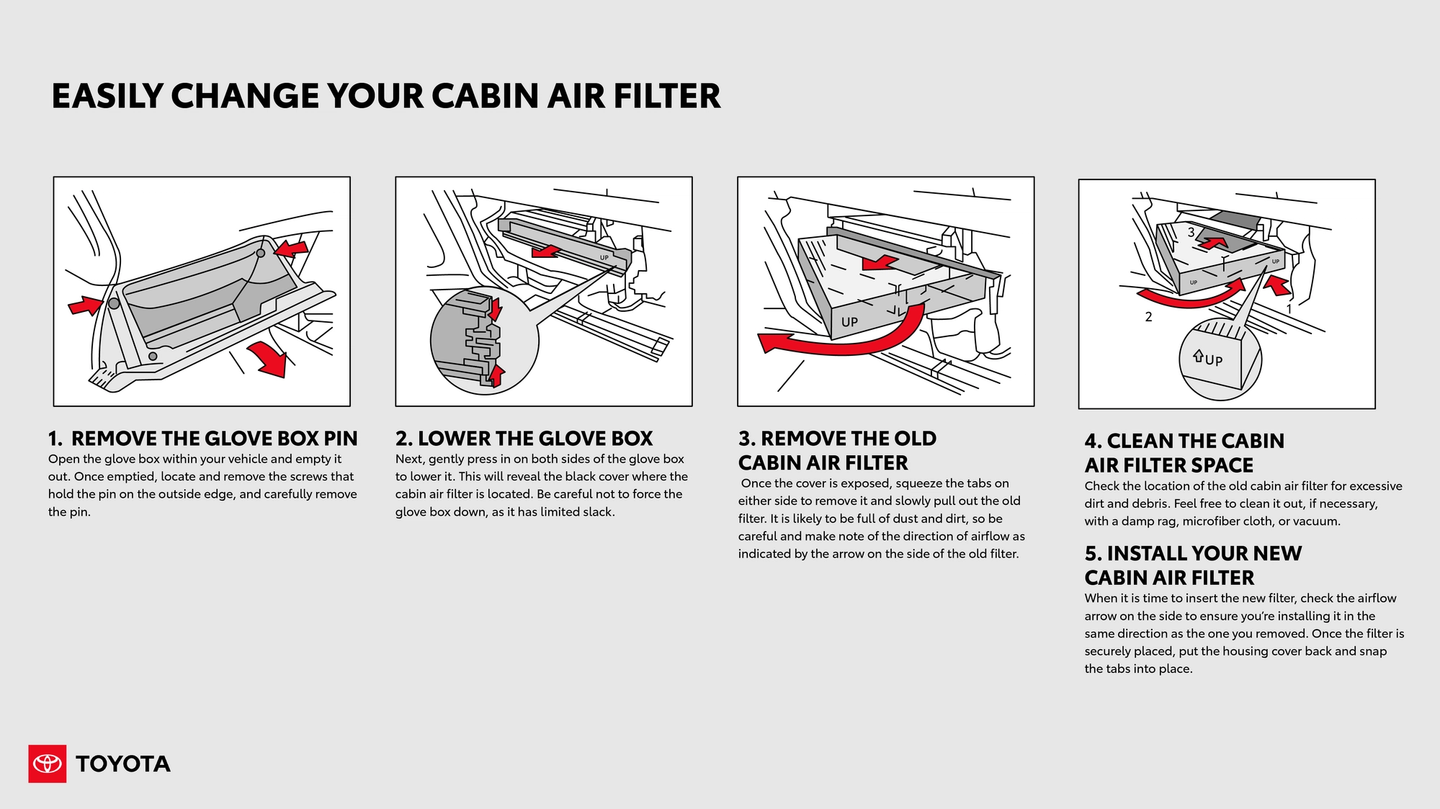
Open the glove box completely to access the filter area. Most glove boxes have stops or tabs that hold them in place. Press or squeeze these tabs to release the glove box door. Carefully lower the glove box to avoid breaking any parts. This exposes the space behind it where the filter is located.
Finding The Filter Housing
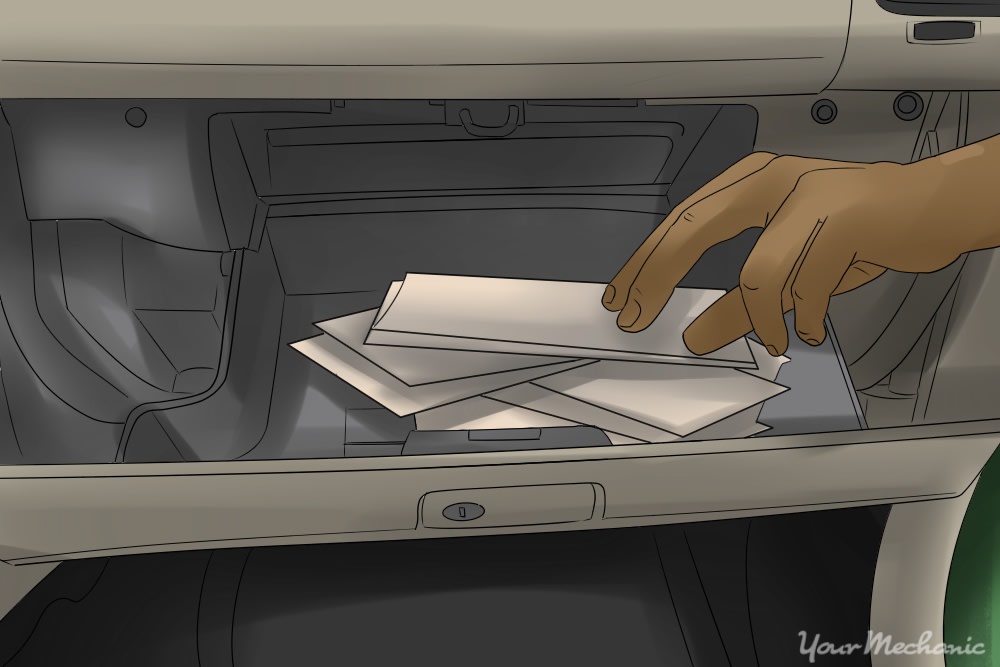
Look behind the lowered glove box for a rectangular cover. This cover is the filter housing door. It may have clips or screws securing it in place. Remove these fasteners gently to open the housing. Inside, the cabin air filter sits ready for removal and replacement.
Credit: www.yourmechanic.com
Remove The Glove Box
Removing the glove box is the first step to changing the air filter inside it. This part protects the filter and holds it in place. You need to take it out carefully to avoid damage. Follow these simple steps to remove the glove box smoothly.
Emptying The Glove Box
Start by taking out everything inside the glove box. Remove papers, small items, and any loose objects. This clears the space and makes handling easier. An empty glove box is lighter and safer to lower.
Releasing The Clips Or Screws
Look for clips or screws that hold the glove box in place. Use a screwdriver or your hands to release them. Be gentle to avoid breaking plastic parts. Some gloves have small tabs that need pressing or pulling.
Lowering The Glove Box Carefully
Once all fasteners are undone, slowly lower the glove box down. Support it with both hands to keep it steady. Do not pull too hard or it may snap. Lower it enough to see and reach the air filter behind it.
Take Out The Old Air Filter
Removing the old air filter from your glove box is a simple step in maintaining clean air inside your car. A dirty filter reduces air flow and lets dust enter the cabin. Taking out the old filter carefully helps prepare for a smooth replacement.
Follow these steps to access and remove the worn-out air filter safely.
Opening The Filter Cover
Start by opening the glove box completely. Look for the filter cover behind it. This cover usually snaps or screws into place. Gently release the clips or unscrew the fasteners. Remove the cover to reveal the air filter inside.
Sliding Out The Dirty Filter
Grasp the edge of the air filter firmly. Slide it straight out of the housing slot. Avoid shaking the filter to prevent dust from spreading. Place the filter on a clean surface for inspection.
Inspecting The Filter Condition
Check the filter for dirt, leaves, or debris. A dark or clogged filter needs replacement. Look for holes or damage that reduce its effectiveness. Clean filters will appear white or light gray. Discard the old filter if it is dirty or damaged.
Prepare The New Air Filter
Preparing the new air filter is a key step before installing it behind the glove box. This step ensures the filter fits perfectly and works efficiently. Taking time to prepare the filter helps avoid mistakes that can reduce air quality inside your car.
Choosing The Correct Replacement
Select the exact air filter for your car model. Check your car’s manual or ask at an auto parts store. Using the wrong size or type can cause poor air flow and damage the system. Always buy a filter that matches the specifications for your vehicle.
Checking The Filter Orientation
Look for arrows or markings on the new filter. These show the correct direction of air flow. Insert the filter so the arrows point the same way as the airflow in your car. Installing it backwards can block air and reduce performance. Double-check orientation before sliding the filter in place.
Install The New Air Filter
Installing the new air filter in your glove box is a simple task. It ensures clean air flows inside your car. Take your time to place it correctly. This step helps keep dust and allergens out.
Inserting The Filter Properly
Hold the new air filter with clean hands. Check the airflow arrows on the filter frame. They must point in the correct direction. Slide the filter gently into the slot. Push it all the way back until it fits snugly. Avoid bending or forcing the filter inside.
Securing The Filter Cover
After placing the filter, align the cover with the glove box opening. Press the cover firmly until it clicks or locks into place. Make sure no gaps remain around the edges. A secure cover keeps the filter stable and prevents air leaks. Close the glove box carefully to finish the job.
Credit: exploresetoyota.com
Reassemble The Glove Box
After replacing the air filter, reassembling the glove box is the final step. This process ensures everything fits back properly and your glove box functions as before. Follow these simple steps to complete the task quickly and safely.
Lifting The Glove Box Back
Start by carefully lifting the glove box back into its original position. Align it with the surrounding dashboard edges. Take your time to avoid damaging any parts or the new air filter.
Reattaching Clips Or Screws
Secure the glove box by reattaching all clips or screws you removed earlier. Make sure each clip snaps in firmly or each screw tightens without forcing. This step keeps the glove box stable during driving.
Restoring Glove Box Contents
Return all items you took out before removing the air filter. Organize them neatly to avoid clutter or damage. Your glove box is now ready for everyday use, with fresh air flowing through your vehicle.
Test And Maintain
After replacing the air filter in the glove box, testing and maintaining it ensures clean air inside your vehicle. Regular checks keep the filter working well and extend its life. This helps keep dust, pollen, and other particles out of your car’s cabin.
Checking Airflow Quality
Turn on the car’s air system and feel the airflow. Strong airflow means the filter is clear and clean. If the airflow feels weak or uneven, the filter might be dirty or blocked. Also, notice any unusual smells or dust inside the car. These signs suggest the filter needs replacement or cleaning.
Scheduling Regular Filter Changes
Set a routine to change the air filter every 12,000 to 15,000 miles. Check your car’s manual for exact intervals. Regular changes prevent dust build-up and keep air fresh. Mark your calendar or set a reminder on your phone. Consistent maintenance protects your health and improves air quality inside the vehicle.

Credit: www.turtlewax.com
Frequently Asked Questions
How To Change Air Filter Behind Glove Box?
Open the glove box and remove its stops to lower it. Locate and slide out the old air filter. Insert the new filter correctly, then reassemble the glove box.
Will Autozone Change The Cabin Air Filter?
AutoZone sells cabin air filters and offers guidance for replacement. They do not provide cabin air filter installation services directly.
Is There A Filter In The Glove Box?
Yes, many vehicles have a cabin air filter located behind or inside the glove box. It cleans incoming air.
What Are Three Symptoms Of A Clogged Cabin Air Filter?
Three symptoms of a clogged cabin air filter are bad odors inside the car, reduced airflow from vents, and foggy windows.
Conclusion
Changing the air filter in your glove box keeps your car’s air fresh and clean. Regular replacement helps improve air quality inside the vehicle. It also keeps the HVAC system running smoothly. The process is simple and takes only a few minutes.
Follow the steps carefully, and you can do it yourself. Clean air means a healthier and more comfortable ride. Don’t wait for signs of a dirty filter to act. Keep your cabin air filter fresh for better driving.