Have you ever taken your glove box out and then struggled to put it back in? You’re not alone.
Reinstalling a glove box might seem tricky at first, but with the right steps, you can do it quickly and easily. In this guide, you’ll discover simple tips to get your glove box back where it belongs without any hassle.
Keep reading, and you’ll save time, avoid frustration, and get your car looking neat again in no time.
Credit: priuschat.com
Prepare The Glove Box
Preparing the glove box is a key step before putting it back in place. This step ensures the glove box fits correctly and works smoothly. Taking time to prepare helps avoid problems later.
Remove Debris And Check Components
Start by cleaning the glove box area. Remove dust, dirt, and small debris carefully. Check the glove box parts for any damage or wear. Look at the hinges, latch, and screws. Replace any broken parts to ensure the glove box functions well.
Gather Necessary Tools
Gather all tools needed for the job. Common tools include a screwdriver, flashlight, and pliers. Having tools ready saves time and effort. Make sure the tools fit the screws and parts of the glove box. Being prepared with the right tools makes the process easier and faster.
Align The Glove Box
Aligning the glove box is a key step in putting it back correctly. Proper alignment ensures smooth opening and closing. It also prevents damage to the glove box or car interior. Take your time to position the glove box carefully. This will help you avoid problems later.
Positioning The Box Correctly
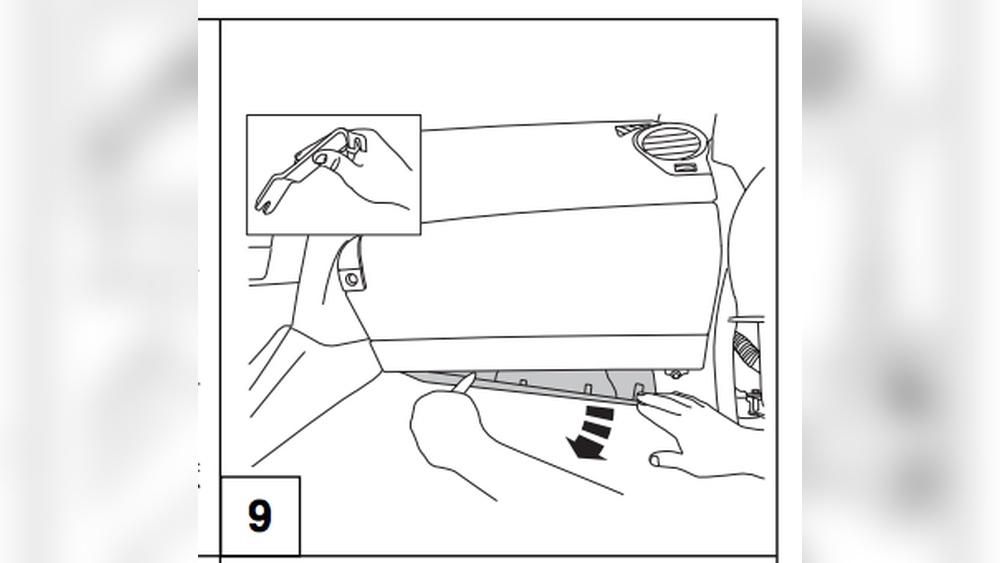
Start by holding the glove box near its place. Look for the hinges or slots where it fits. Slowly move the glove box towards these points. Make sure it lines up with the car’s frame. Don’t force the glove box in. Gentle adjustments work better than pushing hard.
Check if the glove box sits evenly on both sides. Uneven placement can cause it to jam. Keep the glove box straight and level. This will make the next steps easier.
Ensuring Proper Fit
Once the glove box is in place, test the fit. Try closing it softly to see if it matches the frame. The door should close without resistance. If it feels tight or loose, adjust the position slightly. Small movements can improve the fit a lot.
Look for gaps around the edges. Gaps may let dust or noise inside. Aim for a snug fit that seals well. This keeps the glove box secure and functional.
Reconnect The Hinges
Reconnect the hinges carefully to ensure the glove box opens and closes smoothly. This step is key to putting the glove box back securely. Start with the lower hinges, then move to the upper ones. Tighten screws but avoid overtightening to prevent damage.
Attaching Lower Hinges
Place the glove box in position and align the lower hinges with their slots. Insert the hinge pins or screws gently. Check the fit by moving the box slightly up and down. Tighten the screws to hold the lower part firmly. Make sure the glove box does not wobble.
Securing Upper Hinges
Lift the glove box slightly to reach the upper hinges. Align each hinge carefully with the mounting points. Insert screws or pins and tighten them just enough. Test the glove box door by opening and closing it slowly. Adjust screws if the door feels loose or stiff.
Install The Damper Or Stopper
Installing the damper or stopper is a key step in putting the glove box back in place. This part controls how the glove box opens and closes smoothly. It stops the glove box from slamming shut, protecting both the box and your car’s interior.
Handling the damper carefully helps avoid damage. You need to find the right spot and attach it firmly. This ensures the glove box works as it should. The following sections explain how to locate and attach the damper correctly.
Locating The Damper
First, find the damper or stopper inside your car. It is usually near the glove box hinge or side. Look for a small arm or cable connected to the glove box door. The damper often has a plastic or rubber end to cushion the motion.
Check both sides of the glove box area. Some cars have the damper on the right or left side. If you removed the damper earlier, match it to the same spot. The owner’s manual can help identify the exact location.
Attaching The Damper Properly
Start by aligning the damper with its mounting point. Slide or clip the damper into place gently. It should fit snugly without forcing. Use screws or clips if your car requires them.
Ensure the damper moves freely but stays secure. Test by opening and closing the glove box slowly. The damper should slow the motion and stop the box softly. Tighten any loose parts for a firm hold.
Test The Glove Box Operation
Testing the glove box operation is the final step after putting it back in place. This ensures the glove box works properly. You want it to open and close without any problems. A smooth operation means you installed it correctly.
Opening And Closing Smoothly
Try opening the glove box slowly. Notice if it moves easily or feels stuck. Close it gently to check if it shuts fully. Listen for any unusual sounds. Smooth movement shows the glove box fits well.
Adjusting If Necessary
If the glove box is hard to open or close, adjustments might help. Check the hinges and latch for tightness. Loosen or tighten screws slightly to improve movement. Test again after each adjustment. Repeat until the glove box works smoothly.
Credit: www.youtube.com
Tips For Common Glove Box Issues
Glove box problems can be common and frustrating. Simple fixes often solve these issues quickly. Understanding how to handle these problems saves time and effort.
Below are useful tips for fixing common glove box troubles. Follow these steps to get your glove box working smoothly again.
Fixing Loose Hinges
Loose hinges cause the glove box to wobble or not close properly. Start by checking the screws on the hinges. Tighten any loose screws with a screwdriver.
If screws are missing or damaged, replace them with new ones of the same size. Sometimes, hinge pins wear out. Replace old pins to restore stability.
Apply a small amount of lubricant to the hinges. This helps the glove box open and close smoothly.
Addressing Misalignment Problems
Misalignment makes the glove box door hard to close or open. First, inspect the hinges and latch for any damage. Bent hinges need careful adjustment or replacement.
Loosen the hinge screws slightly to adjust the door position. Move the door until it fits perfectly in the frame. Then, tighten the screws securely.
Check the latch mechanism to ensure it lines up with the catch. Adjust or replace the latch if it does not catch properly. Proper alignment improves the glove box’s function and appearance.
Credit: priuschat.com
Frequently Asked Questions
How Do You Reattach A Glove Box Door?
To reattach a glove box door, align the hinges carefully. Insert the hinge pins or screws securely. Ensure the door opens and closes smoothly without resistance.
What Tools Are Needed To Install A Glove Box?
You typically need a screwdriver, possibly a wrench, and replacement screws or pins. Some models may require plastic pry tools for alignment.
How To Fix A Loose Glove Box Latch?
Tighten the screws on the latch mechanism. If worn, replace the latch or its spring for a secure fit.
Can I Reinstall A Glove Box Without Professional Help?
Yes, most glove boxes can be reinstalled using basic tools. Follow your vehicle’s manual instructions for precise steps.
Conclusion
Putting the glove box back in place is easier than it seems. Follow each step carefully and take your time. Check that all clips and screws fit tightly. A secure glove box keeps your car neat and safe. Practice makes the process faster and smoother.
Soon, you will handle this task without help. Keep your tools ready for any future repairs. Enjoy a tidy dashboard and easy access to your items. Simple tasks like this save money and build confidence. Give it a try today!